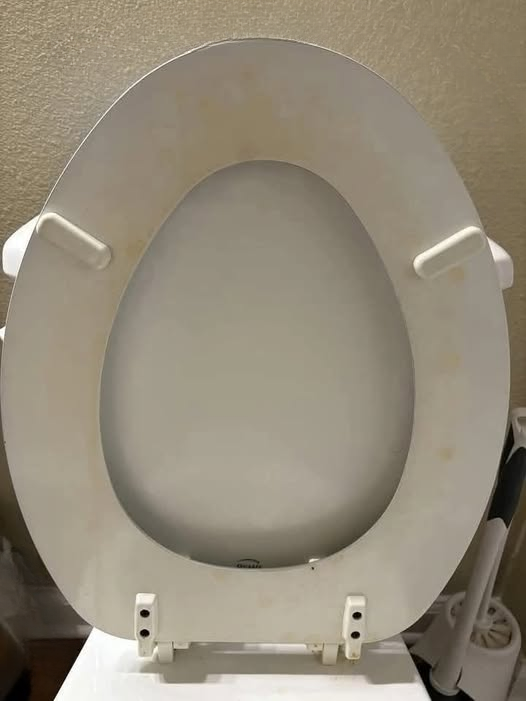
A clean bathroom can instantly make an entire home feel fresher. Unfortunately, toilet stains have a way of appearing even when the bathroom is cleaned regularly. Yellow marks on the seat, mineral rings inside the bowl, discoloration around the hinges, and grime near the base can make a toilet look neglected.
The good news is that many of these stains can be removed without replacing the toilet seat or using extremely harsh chemicals. The key is identifying what caused the discoloration and choosing a cleaning method that will not damage the surface.
Here is a practical guide to cleaning the toilet seat, bowl, hinges, tank, base, and surrounding floor safely and effectively.
Why Do Yellow Toilet Stains Appear?
Not every yellow mark comes from the same source. Understanding the cause of a stain makes it easier to select the right cleaning method.
Hard-water minerals
Hard water contains minerals such as calcium, magnesium, and sometimes iron. As water evaporates, these minerals remain behind and gradually create yellow, orange, brown, or chalky deposits.
Mineral stains are especially common around the toilet bowl’s waterline. They can become difficult to remove when they are allowed to build up for several months.
Urine residue
Small splashes can reach the underside of the seat, hinges, rim, base, and surrounding floor. If they are not cleaned promptly, they may cause yellow discoloration and unpleasant odors.
The areas around seat bolts and hinges are particularly vulnerable because moisture can collect in narrow spaces that are difficult to reach during ordinary cleaning.
Mold and mildew
Bathrooms are naturally warm and humid, creating favorable conditions for mold and mildew. Dark marks around seals, hinges, or the base may indicate moisture accumulation rather than ordinary dirt.
Proper ventilation and frequent cleaning can help prevent these organisms from returning.
Everyday grime
Dust, hair, body oils, soap residue, and cleaning-product buildup can all collect on bathroom surfaces. Over time, these materials may leave a dull or discolored layer on a white toilet seat.
Permanent material discoloration
Not every stain can be removed. Older plastic seats may turn yellow because of age, sunlight, chemical damage, or deterioration of the material itself. If cleaning produces little improvement, replacement may be the most practical solution.
Important Safety Precautions
Cleaning products should never be combined randomly. Certain mixtures can release dangerous fumes or create irritating chemicals.
Never mix bleach with:
- Vinegar or other acidic products
- Ammonia
- Rubbing alcohol
- Toilet bowl cleaners
- Hydrogen peroxide
- Other household chemicals unless the label specifically permits it
Use only one cleaning method at a time. Rinse the surface thoroughly before applying a different product. Keep the bathroom ventilated, wear cleaning gloves, and follow the instructions printed on every product label.
If strong fumes develop, leave the room immediately and move into fresh air.
What You Will Need
You do not need every item on this list. Select the supplies that are appropriate for the stain and toilet material:
- Rubber or disposable cleaning gloves
- Mild dish soap
- Warm water
- Baking soda
- White vinegar
- Hydrogen peroxide
- A non-scratch sponge
- Microfiber cloths
- An old toothbrush or small cleaning brush
- Toilet brush
- Paper towels
- A toilet-safe pumice stone
- Disinfectant suitable for bathroom surfaces
Before using any product, test it on a small, hidden area. Some plastic seats and decorative finishes are more sensitive than others.
How to Clean Yellow Stains From a Toilet Seat
Begin by removing loose dust and debris with a damp cloth. Then wash the seat with warm water and a small amount of mild dish soap. This removes surface oils that could prevent a stain treatment from working properly.
Remember to clean the lid, underside of the seat, outer edges, and bumpers.
Method One: Baking soda paste
Baking soda provides gentle scrubbing power and may help lift everyday grime without severely scratching the plastic.
Mix baking soda with a small amount of water until it forms a spreadable paste. Apply it directly to the yellow areas and allow it to remain for approximately 10 to 15 minutes.
Gently scrub the stain with a soft sponge or toothbrush. Wipe away the residue with clean water and dry the seat with a microfiber cloth.
Avoid using excessive force. Aggressive scrubbing can make a glossy seat look dull and may create tiny scratches that collect more dirt later.
Method Two: Diluted white vinegar
White vinegar can help loosen certain hard-water deposits. However, it should be used carefully and should never be combined with bleach.
Dampen a cloth or paper towel with diluted vinegar and place it over the mineral-stained area for several minutes. Remove it, wipe the surface, and rinse thoroughly with clean water.
Check the toilet manufacturer’s care instructions before using acidic cleaners. Vinegar may not be appropriate for every material, finish, or component.
Method Three: Hydrogen peroxide
Hydrogen peroxide can sometimes improve organic stains and mild discoloration.
After confirming that no other cleaner remains on the surface, dampen white paper towels with household hydrogen peroxide. Place them over the affected area and allow them to sit for about 20 to 30 minutes.
Remove the towels, gently wipe the area, and rinse it thoroughly. Do not use peroxide immediately before or after vinegar. Never combine it with bleach.
Be careful with melamine cleaning sponges
Melamine sponges, commonly known as magic erasers, can remove stubborn surface marks. However, they work through mild abrasion and may dull or damage glossy plastic.
If you choose to use one, test it on a hidden section first. Wet the sponge, apply very light pressure, and stop if the surface begins to lose its shine.
Don’t Forget the Hinges and Seat Bolts
The hinges are often the dirtiest part of the toilet seat. Moisture, dust, and residue become trapped around the bolts, producing stains and odors.
If the seat has quick-release hinges, check the manufacturer’s instructions to see whether it can be removed safely. Taking off the seat can make deep cleaning significantly easier.
Otherwise, spray an appropriate bathroom cleaner onto a cloth rather than directly into the hardware. Use a toothbrush or narrow cleaning brush to reach around the hinges and bolt covers.
Wipe the area with clean water and dry it carefully. Allowing moisture to remain around metal parts may encourage corrosion.
When the Toilet Seat Should Be Replaced
Cleaning may not restore a toilet seat if the discoloration is inside the material rather than on its surface.
Consider replacing the seat when:
- Yellowing remains after several gentle cleaning attempts
- The plastic is cracked, peeling, or deeply scratched
- The hinges are damaged or badly corroded
- Strong odors remain trapped in the material
- The surface has become rough or difficult to sanitize
A damaged seat can hold moisture and bacteria in places that ordinary cleaning cannot reach. In that situation, replacement is often easier and more hygienic than continued scrubbing.
How to Remove Rings From the Toilet Bowl
Toilet bowl rings are usually caused by minerals, rust, or accumulated residue at the waterline. Begin with the least abrasive method and increase the cleaning strength only when necessary.
Start with a toilet brush
Apply a toilet bowl cleaner that is compatible with your plumbing and toilet surface. Follow the label’s recommended waiting time before scrubbing beneath the rim and around the waterline.
A firm toilet brush may be enough to remove newer deposits.
Use vinegar for mineral buildup
If the bowl contains hard-water deposits, vinegar may help loosen them. Pour an appropriate amount into the bowl and allow it to remain for 20 to 30 minutes before scrubbing.
For heavier buildup, it may need more contact time. Never add bleach or a bleach-based cleaner while vinegar is present. Flush thoroughly before changing to a different cleaning product.
Try a toilet-safe pumice stone carefully
A wet pumice stone can remove stubborn mineral rings from certain porcelain toilets. Both the stone and the toilet surface must remain wet throughout the process.
Use very gentle pressure and test a small area first. Do not use pumice on plastic, fiberglass, coated surfaces, colored fixtures, or any material not approved by the manufacturer.
Stop immediately if you notice scratching or a change in the finish.
Address rust-colored stains
Orange or brown marks may be related to iron in the water, rusting components, or old plumbing. A product specifically labeled for rust and mineral deposits may work better than an ordinary disinfectant.
Read the label carefully to confirm that the product is safe for toilets and compatible with a septic system if your home uses one.
If rust stains return quickly, cleaning alone may not solve the underlying problem. The tank components, water supply, or plumbing may need inspection.
Should You Use Bleach Tablets?
Bleach can disinfect certain surfaces, but continuous-use tablets placed inside the tank may damage seals, flappers, and other rubber or plastic components over time. This could eventually lead to leaks or a toilet that runs continuously.
Check the toilet manufacturer’s guidance before putting any chemical tablet in the tank. A product that cleans the bowl effectively is not automatically safe for internal plumbing components.
Bleach also does not remove every mineral stain. It may temporarily lighten discoloration without dissolving the buildup responsible for it.
Cleaning the Tank, Handle, and Exterior
The exterior of the toilet receives frequent contact but is sometimes overlooked.
Apply a surface-compatible cleaner to a microfiber cloth and wipe the toilet from the cleanest area to the dirtiest:
- Top and sides of the tank
- Flush handle or button
- Lid and seat
- Rim and outside of the bowl
- Pedestal and base
Cleaning in this order helps prevent transferring grime from the floor area to surfaces that people touch.
Pay special attention to the flush handle because it is touched before hands are washed. After cleaning, apply a suitable disinfectant according to its label. Many disinfectants need to remain visibly wet for a specific period to work effectively.
Avoid spraying large amounts of liquid directly into buttons, hinges, bolts, or openings.
Cleaning Around the Toilet Base
Hair, dust, moisture, and splashes tend to collect where the toilet meets the floor.
Remove dry debris first with a disposable cloth, vacuum attachment, or duster. Then clean the floor with a product that is safe for the flooring material. A cleaner suitable for tile might not be appropriate for natural stone, wood, or certain types of vinyl.
Use a separate cloth for the floor and toilet base. Do not reuse it on the seat, tank, sink, or other high-touch surfaces.
If you notice moisture repeatedly gathering around the base, investigate the cause. A persistent wet area, soft flooring, unpleasant smell, or damaged seal may indicate a plumbing leak that requires professional attention.
How to Prevent Toilet Stains From Returning
Prevention is easier than removing months of buildup.
A simple maintenance routine can include:
- Wiping the seat and rim several times per week
- Cleaning beneath the seat and around the hinges
- Brushing the bowl regularly
- Drying areas where moisture collects
- Improving bathroom ventilation
- Repairing running water or small leaks promptly
- Using compatible products instead of harsh chemical mixtures
- Deep-cleaning the base and surrounding floor every week
Homes with hard water may benefit from more frequent bowl cleaning. In severe cases, a plumber or water-treatment professional can help identify practical options for reducing mineral buildup.
Final Thoughts
Yellow toilet stains may look unpleasant, but many are simply the result of mineral deposits, ordinary residue, moisture, or areas that are difficult to reach. Gentle cleaning methods, patience, and regular maintenance can often restore the toilet without damaging it.
Begin with mild soap and water, then try a baking soda paste or another material-safe treatment if necessary. Reserve abrasive tools and stronger products for stubborn deposits, and always follow safety instructions.
Most importantly, never mix household cleaning chemicals. A spotless toilet is useful, but protecting your health, bathroom surfaces, and plumbing is far more important.