When my grandmother first taught me her old-fashioned trick for cleaning a clogged dryer vent, I honestly didn’t think it would do much. No expensive gadgets, no professional cleaning service—just a vacuum, a long dryer-vent brush, and her loud old leaf blower. She flashed that confident smile she’s had my whole life and said, “Trust me. This keeps the dryer running better than anything you can buy.”
It turns out she was right. Her simple method has kept her machines running efficiently for decades—saving money, preventing dryer wear, and reducing the risk of dangerous lint fires.
Most people underestimate how serious a clogged dryer vent can be. According to the U.S. Fire Administration, nearly 2,900 home fires each year are caused by dryers, and the number one cause is failure to clean the dryer vent. When Grandma said this was essential home care, she meant it.
Why Cleaning Your Dryer Vent Matters
Over time, lint builds up deep inside the vent duct—far beyond the lint trap. This buildup:
-
Reduces airflow
-
Makes the dryer run longer
-
Raises energy bills
-
Causes the machine to overheat
-
Increases fire risk
-
Shortens your dryer’s lifespan
Even if you clean the lint trap after every load, lint still escapes into the duct. That’s why a deeper cleaning routine is critical.
Grandma’s method is easy, effective, and surprisingly satisfying.
Step 1: Safety First
Before she touches anything, Grandma follows strict safety steps:
-
Unplug the dryer
-
Turn off the gas supply (if it’s a gas dryer)
-
Pull the machine forward just enough to access the vent
-
Make sure the area is clear of flammable items
Simple, but important.
Step 2: Vacuum the Vent Opening
With the back of the dryer exposed, she uses a vacuum hose to suck out everything she can reach from:
-
The vent opening
-
The floor area behind/under the dryer
-
Any dust or lint around the back panel
You’d be shocked how much collects behind the dryer without anyone noticing.
Step 3: Use a Long Dryer Vent Brush
This is where the real work begins.
She threads a long, flexible dryer vent brush deep into the duct, twisting and pushing gently to break loose any lint stuck to the duct walls.
After brushing, she vacuums again—and this alone removes a big portion of the hidden buildup.
Step 4: Grandma’s Secret Weapon — The Leaf Blower
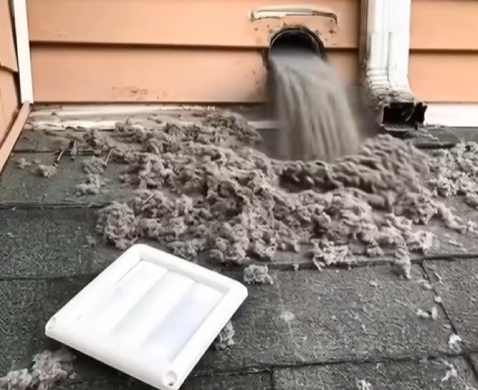
This is the part I didn’t believe until I saw it.
Grandma goes outside to the exterior vent, removes the cover, and inserts the nozzle of her leaf blower. With a few strong blasts, a shocking cloud of lint comes flying out of the vent—enough to show why this method works so well.
It’s messy, yes. But nothing cleans a long duct faster or more completely.
Step 5: Reassemble & Test
Once everything is cleaned:
-
The vent cover goes back on
-
The dryer is pushed into place
-
Power and gas are reconnected
-
A short cycle is run to check airflow
Immediately, the dryer runs quieter, smells fresher, and dries clothes faster. The difference is obvious.
How Often Should You Clean the Dryer Vent?
Grandma does it twice a year:
-
Spring
-
Right before winter
If you dry large loads often (towels, blankets, heavy fabrics), you may need to do it every 3–4 months.
A Timeless, Budget-Friendly Routine
In a world full of pricey gadgets and services, this old-school hack is one of the most valuable home-maintenance lessons my grandmother ever taught me. It’s:
-
Cheap
-
Simple
-
Fast
-
Extremely effective
-
Fire-safe
And it keeps both your home and your dryer in better shape for years to come.
Sometimes the best solutions really are the ones passed down through generations.